A Step By Step Guide To Viewing The Revelation 12 Sign in Stellarium

I really believe God blesses us most when we search these types of things out for ourselves... just like the Bible. Do not rely solely on other peoples videos, study the sign for yourself in your own intimate way. Playing it forward and backward will increase your faith in its relevancy tenfold! Your appreciation for all that God has brought together in the sky will leave you in AWE. Next time you have a friend over you will be able to demonstrate it for them too! You can do this... I promise you in much shorter time than you think you will viewing the universe in a way you never thought you could! Download and enjoy a whole new world of wonder today.
Note: This process may seem long based on the length of this post, but it is very straightforward. I broke it down into so many steps so that the process is very spelled out and easy to follow... easy enough so anyone can do it (even if you are not very good with computers). Do not let the length of this post fool you... this is easy and you can surely do it!!
Step 1: Download the Software
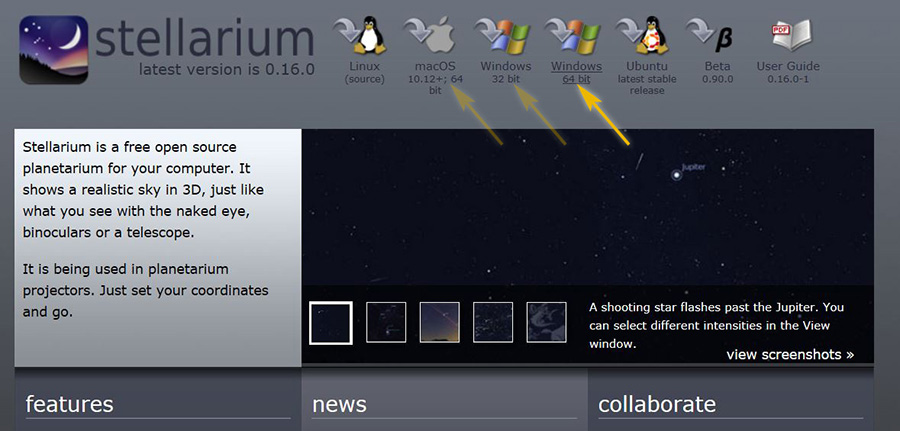
The first step is going to http://www.stellarium.org/ and downloading the FREE software onto your computer. I know this may make you nervous... but let not your heart be troubled! There are no added extras or ads or spyware associated with this download. IT IS SAFE! Click on the button at the top of the screen which corresponds to the type of computer you have. I have a newer computer which is Windows 64 bit. If your computer is older, it is likely 32 bit. If you have an Apple, click the button for that. If you are unsure, go to your "My Computer" icon, right click on it and hit "Properties"... 64 or 32 bit will be listed under "System Type".
Step 2: Installing the Software
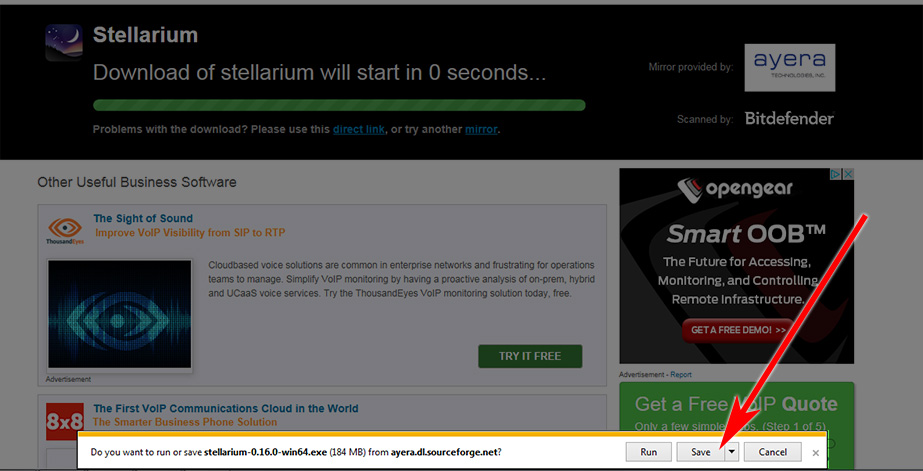 Once you click the icon you will be brought to a new screen (don't get nervous) and the download will begin automatically (wait for a bar to appear at the bottom of the page). Once the bar appears click SAVE. It should then start downloading. When it completes downloading that same bar at the bottom of the screen will change slightly giving you new options. Now click RUN. This will officially install the software on your computer. Follow any prompts and then open the software through the shortcut on your desktop!
Step 3: Opening Stellarium / Initial View
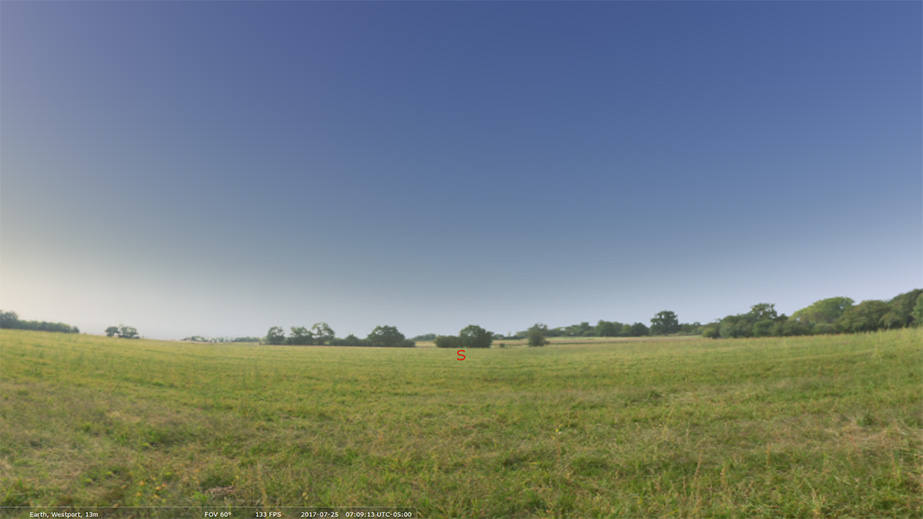
Depending on what time of day you open your software you will likely see a bright blue sky. If you are opening it at night you may see stars. This is because the software matches the time of day in real time. Don't worry, we will adjusting these settings shortly so you can see the stars and constellations at all times.
Step 4: Finding the Control Buttons

The buttons for the software automatically hide themselves on the screen. If you hover your mouse pointer in the left corner or left bottom of the screen you will see the button bars appear. The button highlighted here with the yellow circle around it is the FULL SCREEN button... click this if you want to exit full screen mode and do something else on your computer (or read this page at the same time). If you need to close the program hit the button on the far right of the bottom bar which the right-most arrow is pointing at.
Step 5: Removing the Ground and Atmosphere, Turning on Labels
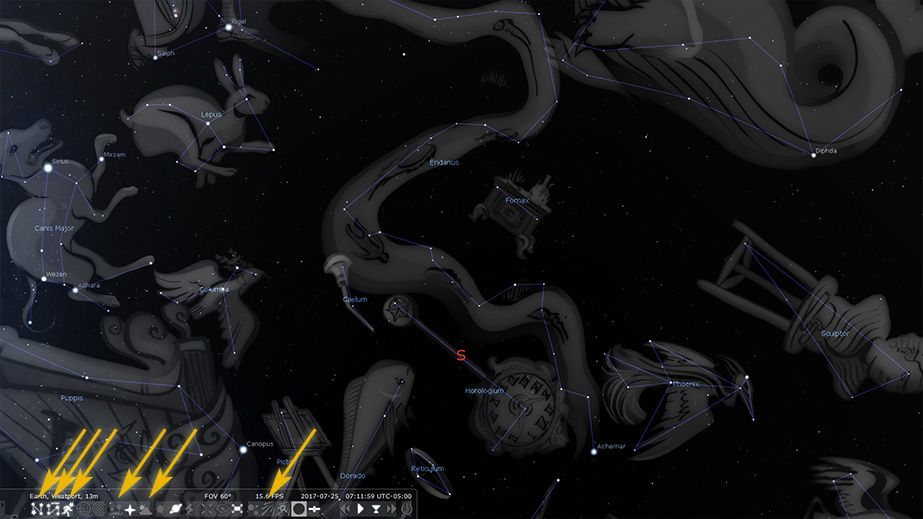
Now it is time to adjust your settings so you can see the stars, constellations. You will be turning on and off a number of buttons on the bottom bar. First, turn the first 3 buttons on the left on... (you will see the constellation artwork and lines and names appear). Next click off the buttons with the trees and the other with the cloud. This will turn off the ground/landscape and the atmosphere... allowing you to see all of the heavens. Lastly, I like to click off button which the right-most arrow is pointing to (this removes the meteor showers which we don't need).
Step 6: Move the Screen to Virgo / Leo
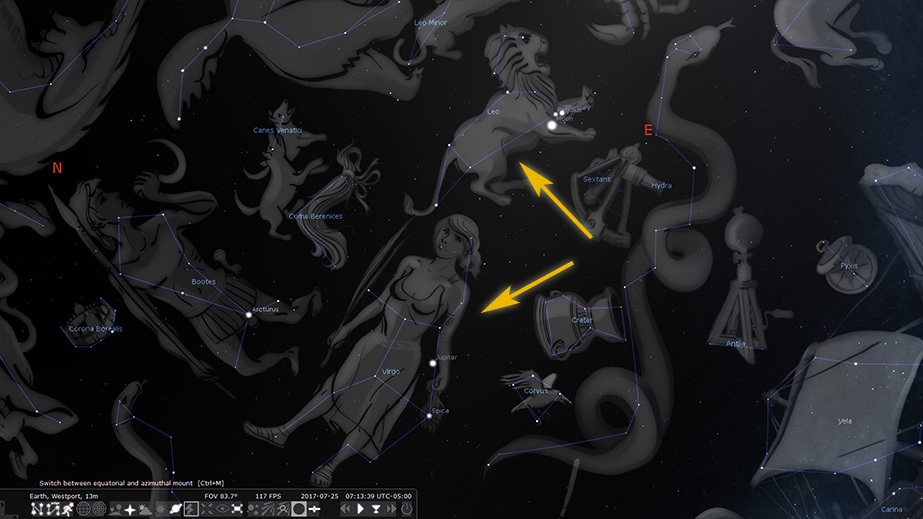
Using your mouse, hold down the right button and pan around until you see Virgo and Leo. You can zoom out by rolling your center mouse button and rolling down so you can see more of the sky. You can also zoom in and out by using the Page Up and Page Down buttons on your keyboard. Once you find the woman and the Lion and have them centered on your screen you are ready for the next step.
Step 7: Click On the Coordinate System Button
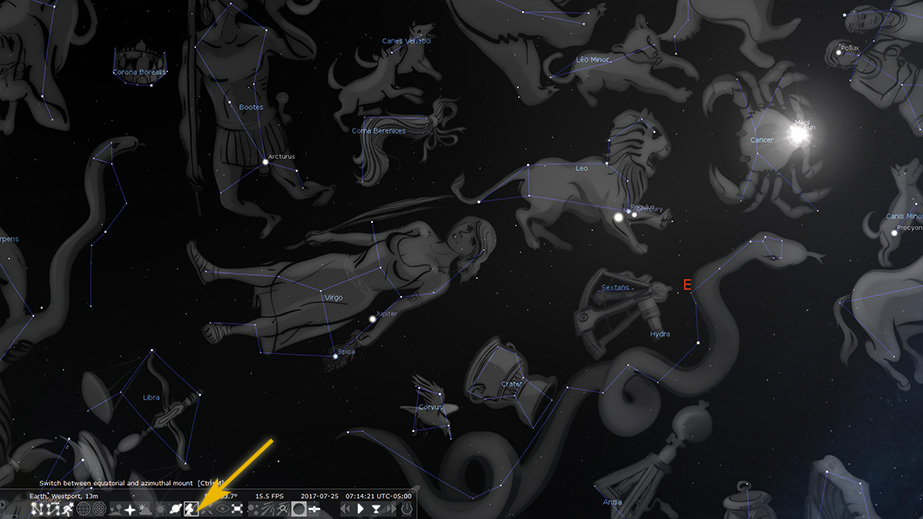
This next step gets missed by many and is the cause of much frustration, especially later on when you will be fast forwarding through time to see things move. Turn on the button with the Telescope to lock in your view. If you don't click this button your screen will make you dizzy when time passes quickly, which was the one problem you may have noticed in the comet video we shared recently.
Step 8: Move Location to Jerusalem
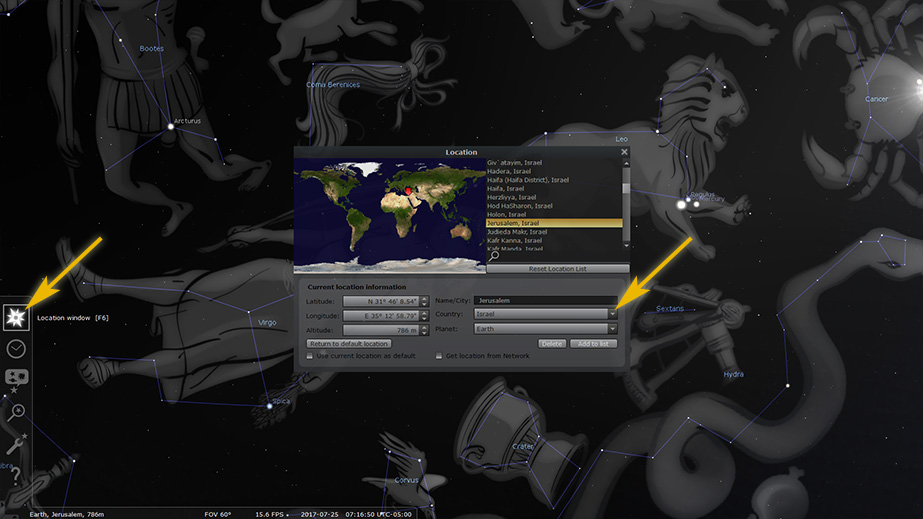
This next step is not totally required as you can see the sign just fine no matter the location earth using the software. But if you want to be precise, you can move it to Jerusalem by clicking on the top button of the left bar. Chance the country to Israel and find Jerusalem in the City box. If you are in a hurry or not that concerned about absolute precision, just skip this step and move on to Step 9.
Step 9: Locate the Date and Time Box
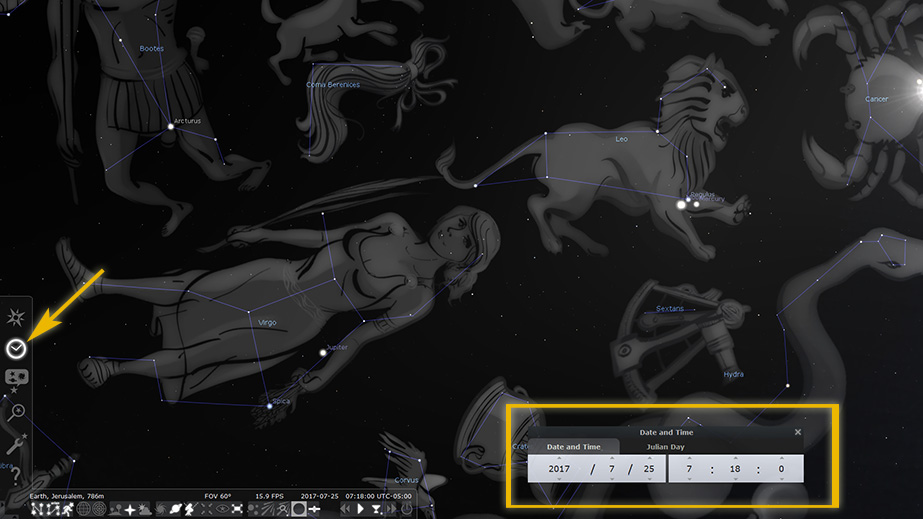
It is now time to see the Revelation 12 Sign. To do this you must adjust the Date. To make the Date and Time Box appear, click the clock button on the left bar. A box will appear in which you can change the date and time.
Step 10: Adjusting the Date and Time
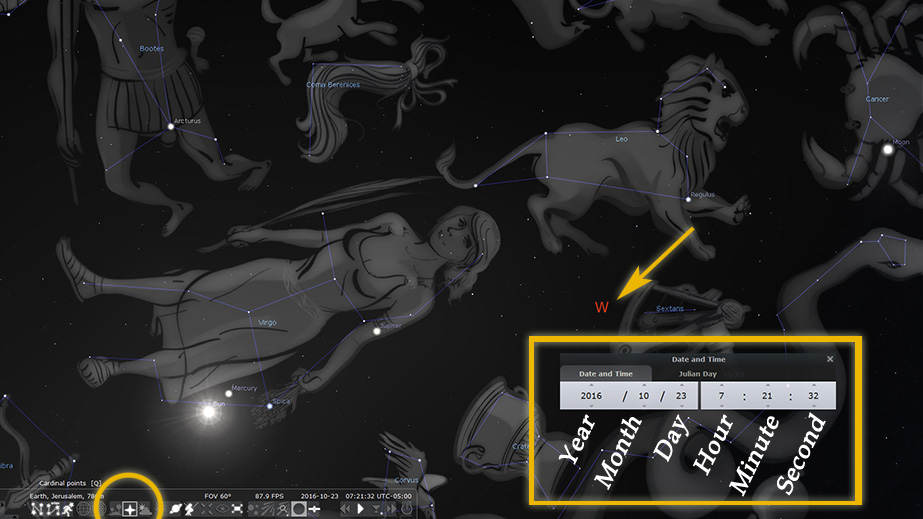
The Date and Time box can be a little confusing, but one it is really quite simple. It just list the Year, Month, Day, Hour, Minute and Seconds from left to right. There are up and down arrows which allow you to adjust these values. At this point you can just skip straight to September 23, 2017 if you would like. For the sake of learning I will suggest going to Octobers 23, 2016 however, as shown in the image above... then I can teach you how to animate the screen giving you a moving view of how the Rev 12 Sign comes together!
Step 11: Manually Adjusting / Animating the Software
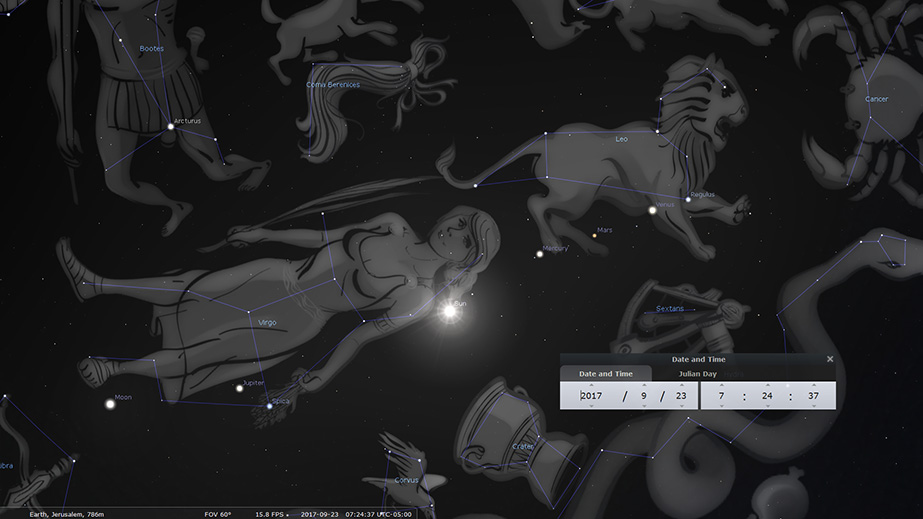
To show the sign come together, first adjust to date to October 23, 2016, (2017 / 10 / 23 as shown in step 10). Then click the up arrow above the month value to move forward in time one month at a time. You will see the Sun, moon, and planets all move. Pay special attention to Jupiter moving around inside the belly of Virgo... representing the child in the womb. Keep clicking the month up arrow until you arrive on the day of the alignment (2017 / 9 / 23 as shown above). To get the moon exactly under her feet you may need to adjust the hour value until the moon moves into the exact position. This is the most straight forward way to move through time in the software.
Step 12: Automatically Playing Time Forward
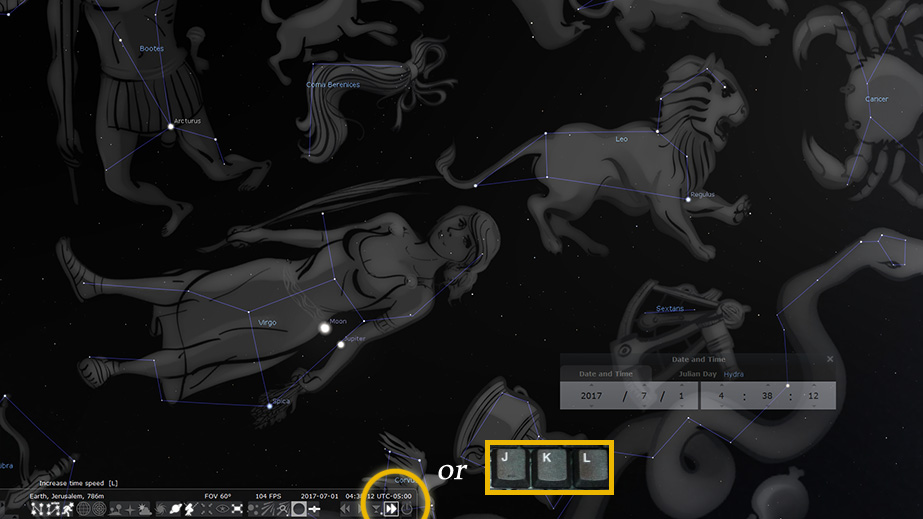
To get a very smooth view of how the planets move, it is best to use the automatic Fast Forward and Play Buttons on the bottom bar. This is very similar to a DVD or VCR. When PLAY is clicked, time will move forward in real time.... very slowly. You will not see anything move. To see the sign move you must fast forward the time (Click the button with the double arrows pointing right) Click it a number of times to speed up time until you see Jupiter moving. Watch how everything comes together. You can click the other set of arrows (pointing left) to slow down the speed, or keep click to go backwards in time. Click the play button to stop it and feel free to use the Manual Date and Time buttons above to fine tune. If you like shortcuts... the J - K - L buttons on your keyboard perform these functions. The middle button K is the Play/Pause button, and J and L will slow down/ go backward and speed up/ go forward respectively.
Step 13: Study The Moving Details
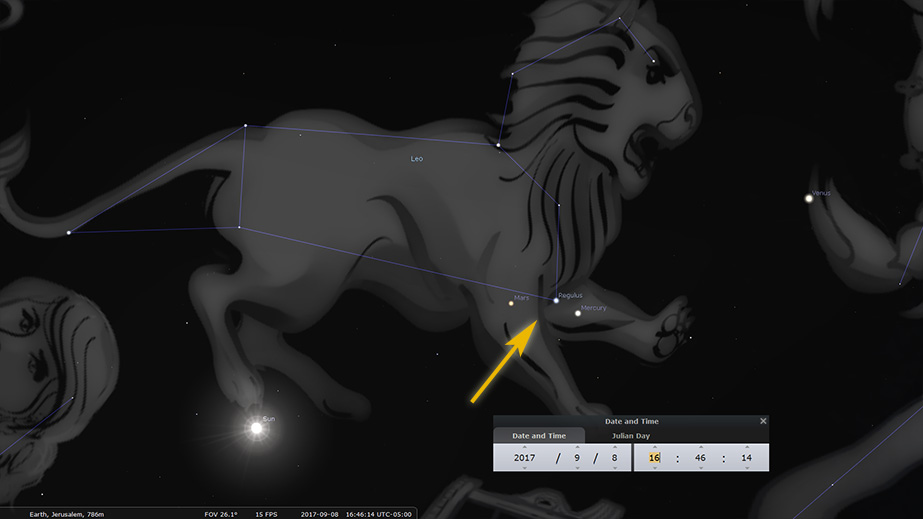
Once you get familiar with how to control the movement of time I would suggest moving in and studying the amazing details of this sign. For example, zoom into Leo and watch the planets pass by "King Star" Regulus which was so beautifully shared in this Opening Ceremony video. Or zoom into the womb area of Virgo and watch how Jupiter does a loop in her belly for just over 9 months. God has blessed us not only with the Sign itself, but also with the software which allows us to study its details over and over again! Imagine the Magi who only had one chance to see the sign for Christ's birth, and had to be looking on the correct night or they would have missed it. We now have the ability to study all aspects of this Great Sign months in advance any time we wish. It is an amazing gift when you think about it...and that is why I am praying this guide helps you see that for yourself.
Step 14: Notice the Location of the New Moon
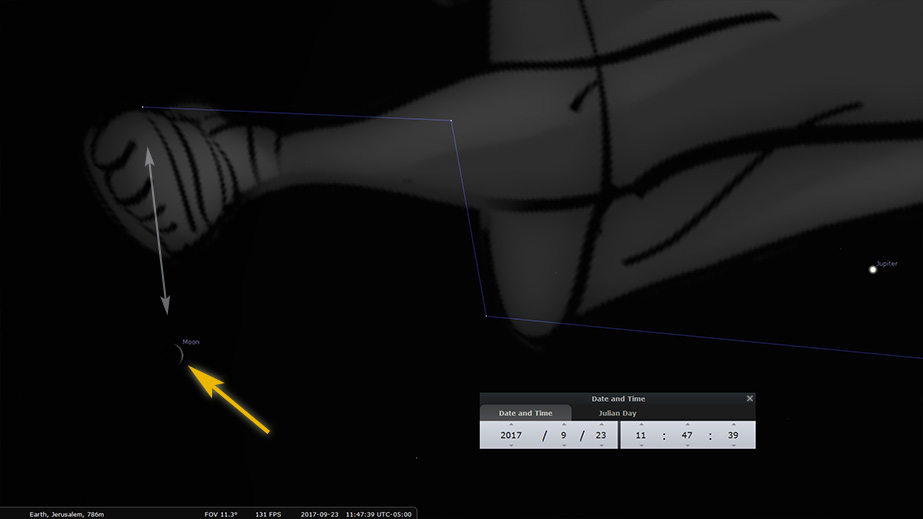
Another detail you may want to look at is the Moon. Zoom in and notice how the software shows just a tiny crescent. That is because this sign is happening on a New Moon. This is the sliver of light the priests would see when declaring the beginning of the Feast of Trumpets. Additionally, notice how close the moon is to the foot of Virgo. In many other years the moon does not get this close to the foot. Now that you know how to go back in time you can study this and see how it is often times farther below her feet. It's just another amazing detail showing how precise this sign really is.
Step 15: Continue Exploring
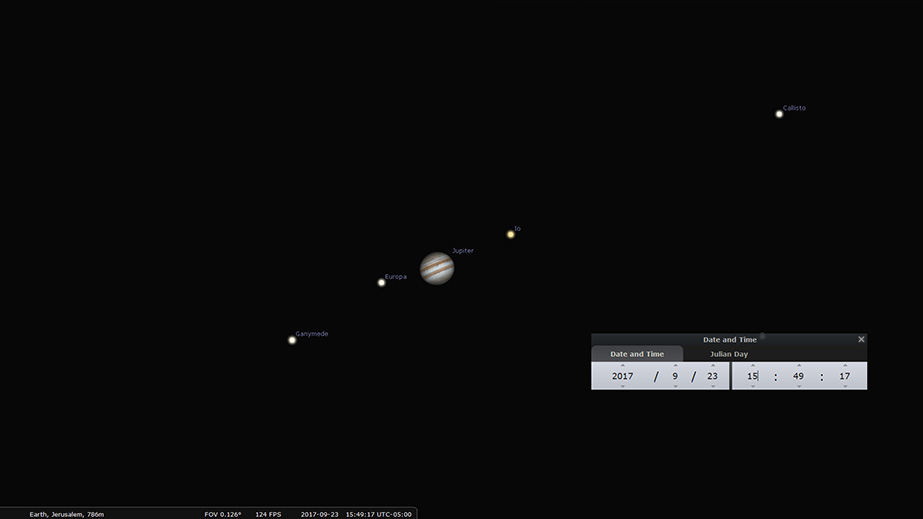
After you have gone over the basic of the Rev 12 Elements, feel free to continue exploring. This software is amazingly detailed and precise. For example, zoom way into Jupiter and you will see an image of the planet along with the precise location of its moons! Then go outside with your telescope and see if its accurate. On day I was outside and noticed a bright satellite overhead... I went in, turned on my computer, and sure enough, Stellarium had that very bright object moving across the sky as well! Time to have some fun!
Step 16: Compare With Other Supposed Fulfillment Dates
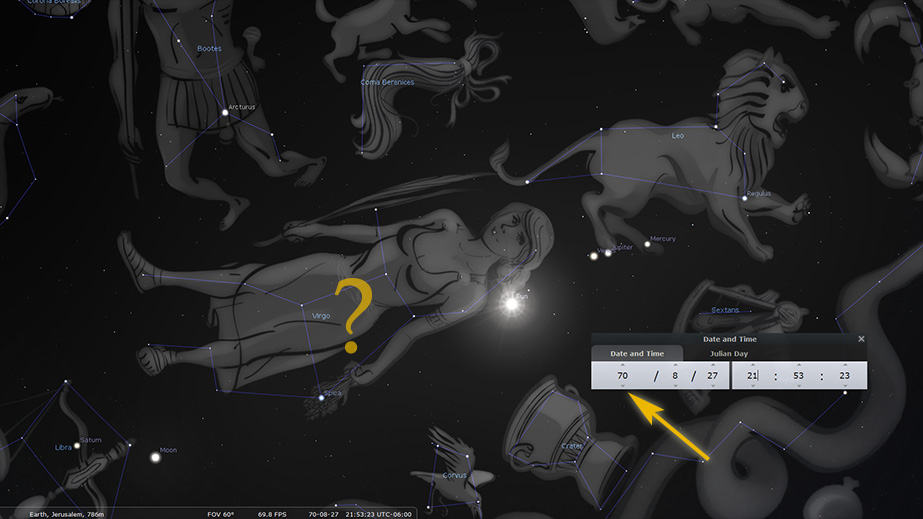
Now that you are familiar with the software you are now able to compare the 9-23-17 alignment with all other supposed fulfillment dates for yourself. You can look at 70 AD, or 3 BC, or 2005 or any other date that gets so flippantly tossed out there by the skeptics and debunkers. You can prove to yourself that those others years suggested by the debunkers as other fulfillments of the sign are bogus. You will soon understand that a false claim like that only serves to hurt the credibility of the debunker rather than do any damage to the legitimacy of this sign in 2017. Search for yourself... you will see that there has not been a fulfillment as perfectly precise to the text of Revelation 12:1-2 as we will see very soon here in 2017... and now you have the knowledge and ability to prove that for yourself!
In addition to the above info, here is a helpful Stellarium Interface Guide which has much more info, tips, and shortcuts to get the most out of the software.
If you have any questions feel free to post a comment below and I will answer it promptly, and if need be, tweak the process above to be more clear. I pray this helps you all grow in faith and in confidence...giving you even more boldness to share your faith with others!!
This is awesome Brad! I'm going to share it and add it to The Sign page on Unsealed.
ReplyDeleteGreat Gary, I hope it helps some people dig into this for themselves! I truly believe that the more they dig, the more likely they are to see that it is TRUE!
DeleteTHANK YOU! THANK YOU!! THANK YOU!!!
ReplyDeleteYOU'RE WELCOME! YOU'RE WELCOME!! YOU'RE WELCOME!!!!!!!!! : )
DeleteThank you so much! Your are/have been the answer to my prayers brother! God bless you!
ReplyDeleteEllie, I can't tell you how much your comment truly means to me. Thank you.
DeleteVery nice. I had to learn the hard way.
ReplyDeleteHumpf.
Brad, thanks so much for this! I downloaded Stellarium a while ago but hadn't mastered yet how to get the views I was seeing online. So appreciate the help. Now I can demonstrate to my family/friends firsthand. Blessings!
ReplyDeleteI hope this helps Keith... reach out via comment if you need any tips. I am sure there are quite a few Stellarium experts reading these pages eager to share their tips and tricks.... : )
DeleteIs it possible to revisit adding the "Conception Comet"?
ReplyDeleteAgain, thank you for all you've done!
You have to add the code into Stellarium... that would be a whole new post! I do believe he referenced how to do it in the video... perhaps he left a link?
DeleteI agree with Anonymous above...need to add the Comet! Here is the original source for the findings of the Comet.
ReplyDeletehttps://www.youtube.com/watch?v=PRNKK_W2Cg4
This was a great idea, and you are so right. It's not until you've put in the time and done a little homework that it becomes startlingly real. Only then do you really begin to get it on a visceral level. Only then do begin to comprehend how rare this is. Only then do no longer have to take a bunch of YouTubers word for anything! =8p
ReplyDeleteIts one thing to watch a video... its an entirely different level when you see it for yourself, at your own pace, in your own home, as many times as you wish.
DeleteAnyone figure out if the Nibiru system is in there somewhere?
ReplyDeleteHere's the link to add a comet to Stellarium: https://www.youtube.com/watch?v=vqKA9W99W0s
ReplyDeleteThank you! Here is a clickable link: https://www.youtube.com/watch?v=vqKA9W99W0s
DeleteAdd any celestial object to Stellarium with very accurate directions:
ReplyDeletehttp://www.wikihow.com/Add-Comet-ISON-to-Stellarium
I'm not sure this isn't getting more traction but the first day I was learning Stellarium I found, to me, the clincher:
ReplyDeleteExactly at sunset, in Jerusalem, on 9/23/17 (18:35 hours) the moon is DIRECTLY under the two feet of Virgo. Pretty cool but wait there's more... It is at sunset of Tishri 2 (at this very specific time) that the last of the 100 shofar blasts will be sounded. So the sign is absolutely PERFECT exactly when the Tekia Gedolah is blasted. What's that we read about "at the last trump"?
Absolute PRECISION.
DeleteThat's what we keep finding. Thanks so much for sharing John... Awesome!
Hi, im trying to find the birth of Christ to show in a sunday school lesson im teaching in the coming weeks, I have the stellarium program, and i have entered -2 for 2 bc and put in sept for the month and 11 on the day, and i put the location as babalon, which is modern day iraq, i think, but i cannot get, no matter how hard i try, the sun above virgo's head and the moon below her feet, with venus passing through her. im sure i have alot wrong. please help. I think that is awesome and im just trying to spead the word. thank you for your help in advance. thank you and may God bless.
ReplyDelete